
Tutorials
Build your first workflow from the contract
Create a workflow in the Pokédex example by dragging two operations onto the canvas, run it in Simulation and against the real API, and read the Arazzo file Luvin wrote.
You will build a workflow that looks up a Pokémon and then its species, run it two ways and read the results. You need about 15 minutes, Luvin open and, for the real run, an internet connection. No credentials are needed.
1. Open the example
Section titled “1. Open the example”- Open Luvin and click Try the example on the welcome screen. If you opened a workspace before, click See the examples and then Try the Pokédex.
- Luvin opens the Pokédex collection and its first workflow, Pokemon card. You will leave it as it is and create a new workflow next to it.
If you have not run the example yet, the Quick start shows it step by step.
2. Create a new workflow
Section titled “2. Create a new workflow”- In the sidebar, click Pokemon card and open the Design tab.
- Click + Workflow in the toolbar above the canvas.
A workflow called New workflow is added to the same file and opens in Design. The canvas says Drag the first operation here.
- Click the name, type
Species lookupand press Enter. A line under the field shows id in the Arazzo:speciesLookup.
See Create a workflow for more on names and descriptions.
3. Add the first step
Section titled “3. Add the first step”The Operations palette, on the left, lists the operations of the contract pokeapi.
- Type
pokemonin Search operation…. - Drag
GET /pokemon/{idOrName}onto the canvas.
The canvas shows a step called getPokemon. Nothing in the workflow provides the value idOrName, so Luvin created an input with that name. The Start card now lists idOrName, and the step uses it. An input is a value you give when you run.
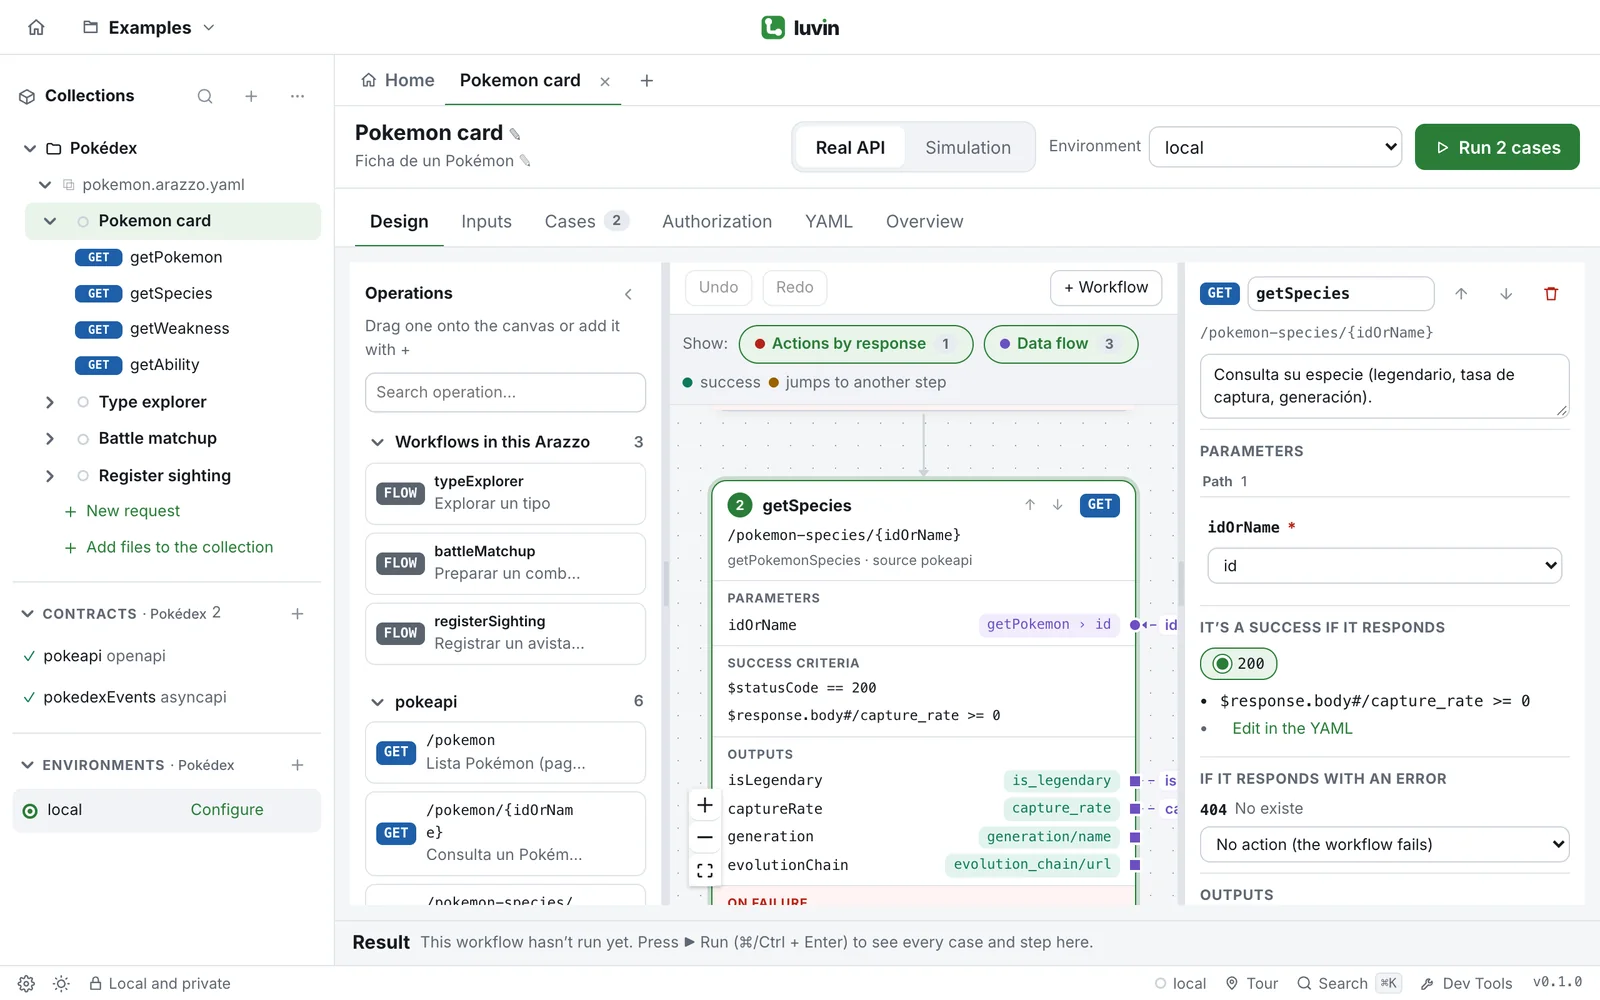
4. Add the second step and see the wiring
Section titled “4. Add the second step and see the wiring”- Search
speciesand dragGET /pokemon-species/{idOrName}belowgetPokemon. - Click the new step,
getPokemonSpecies. Its panel opens on the right. - Under Parameters, look at Path. The value
idOrNamereads? getPokemon › id.
Luvin connected the id that getPokemon returns to the path of the second step, and added the output id to getPokemon. The dashed line on the canvas is that data travelling. The ? means Luvin is less sure about this rule. Here it is right. Connect data between steps lists the rules.
5. Add a step that needs a choice
Section titled “5. Add a step that needs a choice”- Search
typeand dragGET /type/{idOrName}belowgetPokemonSpecies. - Click the new step,
getType. ItsidOrNamereads? getPokemonSpecies › id. That is wrong: a type is not a species id. - Open the list under
idOrName(Source) and choosetypes/type/name (from a list: you choose which at run time), undergetPokemon.
The ? disappears. A Pokémon can have several types, so Luvin cannot choose one for you: it will ask when you run.
6. Set the input
Section titled “6. Set the input”- Click the Inputs tab.
- Under Required, type
pikachuinidOrName.
The badge at the top says Required complete. See Inputs.
7. Run in Simulation
Section titled “7. Run in Simulation”- Click the Cases tab. Luvin generated the cases from your workflow. Happy path, the normal run, is ticked.
- In the run bar, choose Simulation. Simulation calls nothing: Luvin answers with the examples written in the contract.
- Click Run (or press ⌘ Enter, Ctrl+Enter on Windows and Linux).
The results open at the bottom. The case ends as Passed, with a Sim badge, and every step shows Succeeded. If a dialog titled Run paused appears, a list had more than one item: choose one and click Continue with this item. See Simulation.
8. Run against the real API
Section titled “8. Run against the real API”- In the run bar, choose Real API. The environment shows
local. - Click Run.
Luvin calls pokeapi.co. After getPokemon, a dialog titled Run paused opens: the step returned the list types, and getType needs one of its items. Against the real API the dialog appears even when the list has a single item. Pikachu has one type.
- Click Continue with this item.
The run goes on. See Choose an item from a list for what the dialog offers.
9. Read the results
Section titled “9. Read the results”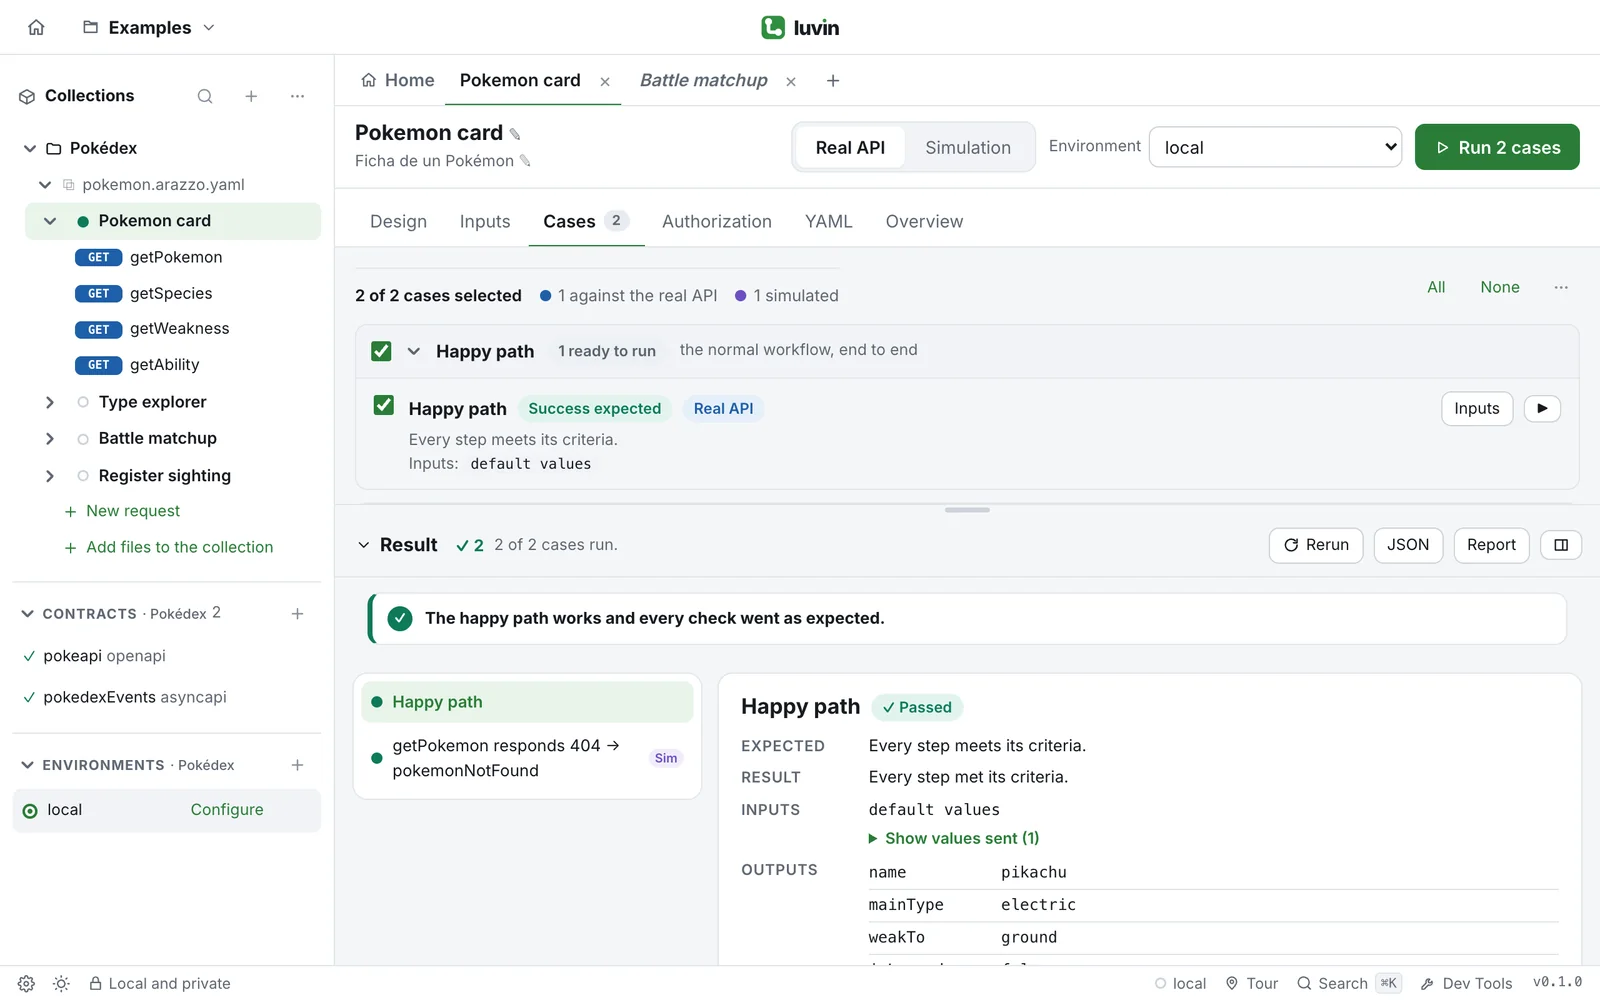
- In the header of the results, check the counters: one case passed.
- Click the case Happy path in the list on the left. The detail shows its verdict, Expected, the Result in plain words and the Inputs used.
- Under the detail, click the card
getPokemon. Its tabs are Criteria, Request, Response, Contract and Outputs. Open Request to see the real URL, withpikachuin the path. - Open the card
getType. A note, Chosen at run time, says which item you chose and which value the step received.
Read the results explains every part.
10. Open the Arazzo file
Section titled “10. Open the Arazzo file”- Click the YAML tab.
This is the file Luvin wrote while you dragged. It is standard Arazzo. The part for your first two steps looks like this:
- workflowId: speciesLookup summary: Species lookup inputs: type: object required: [idOrName] properties: idOrName: type: string steps: - stepId: getPokemon operationId: $sourceDescriptions.pokeapi.getPokemon parameters: - name: idOrName in: path value: $inputs.idOrName successCriteria: - condition: $statusCode == 200 outputs: id: $response.body#/id - stepId: getPokemonSpecies operationId: $sourceDescriptions.pokeapi.getPokemonSpecies parameters: - name: idOrName in: path value: $steps.getPokemon.outputs.id successCriteria: - condition: $statusCode == 200Your file has more lines, for the third step. You can edit it here and the Design tab follows. See The YAML tab.
What you learned
Section titled “What you learned”- Dragging an operation creates a step that is already filled in from the contract.
- Luvin connects the data between steps by rules and marks with
?the one it is less sure about. - A value nobody provides becomes an input.
- Simulation answers from the contract. Real API calls the service, and pauses to ask you when a step returns a list that later steps use.
- The YAML tab shows the standard Arazzo behind the canvas.